
Workspace Overview
Open a project folder inside NetStacks Terminal and get a file tree, a Monaco code editor, Git, a terminal panel and an AI coding tool next to your device sessions.
Overview
A workspace is a saved project folder that opens as its own tab in NetStacks Terminal. You can use it to edit automation scripts, Jinja templates, runbooks or notes, run them, commit them to Git, and work with an AI coding tool such as Claude Code. Your SSH sessions stay open in the tabs next to it.
A workspace gives you:
- A file explorer with Git status on each file.
- A Monaco code editor with tabs, Markdown preview, a Run button for scripts and AI inline edit.
- Language support: Python diagnostics and completion through the Pyrefly language server, plus YANG and XML formatting.
- Git: stage, commit (with an AI-written message), push, pull, branches, history, diff and blame.
- A terminal panel that can run your AI coding tool, a local shell, or one of your saved SSH/Telnet sessions.
Where Workspaces Are Available
Workspaces are a standalone (personal) desktop feature. They rely on the local agent that ships with the desktop app to read and write files, run Git and start language servers.
- Standalone desktop app: available.
- Desktop app connected to a Controller (enterprise mode): not available. The Workspaces button is hidden from the activity bar.
- Web terminal at
/terminal/on the Controller: not available (the web terminal always runs in enterprise mode).
Workspace Layout
An open workspace tab has three areas:
- Sidebar: the Files and Git tabs, shown in the EXPLORER section of the Workspaces sidebar.
- Editor area: tabs for code editors, diffs, blame views and image or media previews.
- Bottom panel: terminal tabs (your AI coding tool, local shells, or SSH/Telnet sessions) and an Output tab for Python runs. If you choose NetStacks Agent as the AI tool, this panel shows the built-in AI assistant instead of terminals.
You can collapse the editor or the bottom panel. Double-clicking a tab strip collapses it, and the collapsed bars read Editor ▼ and Terminal ▲. A collapsed terminal panel keeps running, so your AI tool session is not lost.
The Workspaces Sidebar
Click the Workspaces icon (a folder with a plus sign) in the activity bar, or run Show Workspaces from the command palette (Cmd/Ctrl+Shift+P).
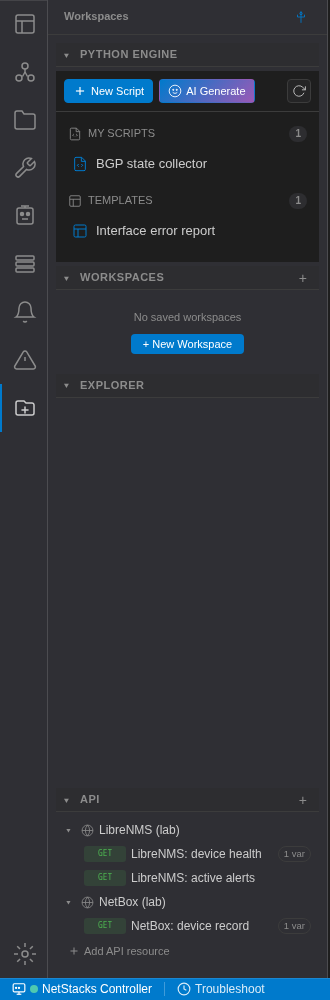
The sidebar has these sections, from top to bottom:
- PYTHON ENGINE: your saved Python scripts and script templates.
- WORKSPACES: your saved workspaces. Each row shows the name and root folder. Open workspaces have an open badge and a ⌫ button that closes the workspace but keeps it saved. The × button deletes the saved workspace entry. It does not touch the folder or Git repository on disk.
- EXPLORER: the Files and Git tabs of the active workspace.
- API: the API client, with your saved API resources and requests.
Create a Local Workspace
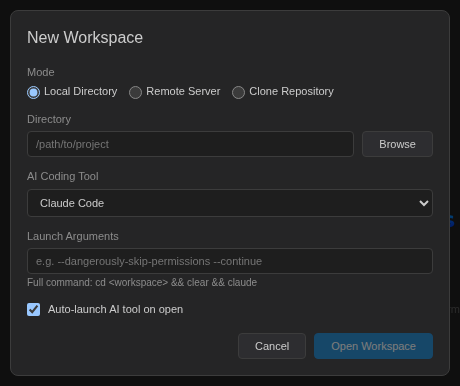
- In the WORKSPACES section, click + New Workspace (or the + next to the section title).
- Leave Mode set to Local Directory.
- Type a path in Directory or click Browse to pick a folder. NetStacks checks the folder as you type and shows the Git branch if it is a repository. For an empty folder or a folder that is not a repository, you can tick Initialize as git repository.
- Choose an AI Coding Tool and, if you want, Launch Arguments. See AI Coding Tools.
- Leave Auto-launch AI tool on open ticked to start the tool in the terminal panel when the workspace opens.
- Click Open Workspace.
Clone a Repository
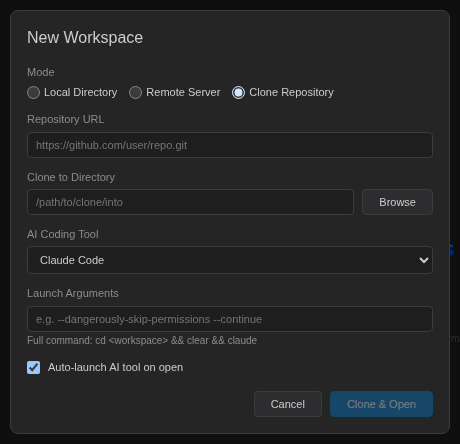
- Open New Workspace and select Clone Repository.
- Enter the Repository URL (for example
https://github.com/user/repo.git). - Pick the parent folder in Clone to Directory. The repository is cloned into a subfolder named after the repo.
- Click Clone & Open. When the clone finishes, it opens as a local workspace.
git, so it uses the credentials Git already has on your machine (credential helper or SSH keys). See Git credentials.Remote Server Workspaces
A remote workspace edits files on a Linux server instead of your own computer. NetStacks copies its agent to the server over SSH, starts it there, and then works with that agent directly.
- Open New Workspace and select Remote Server.
- Choose a saved session in SSH Session and enter the Remote Path (for example
/home/user/project). - Click Open Workspace. NetStacks shows Deploying agent... while it uploads and starts the agent. If deployment fails, click Retry.
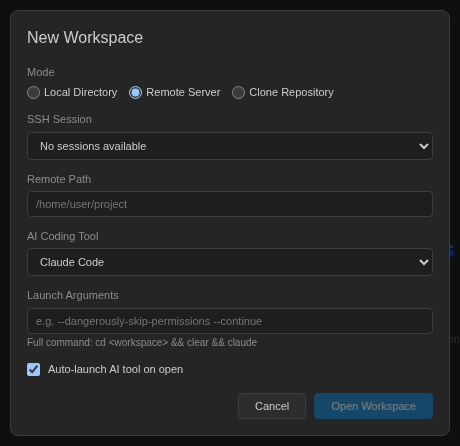
You can also start this from a connected SSH tab: right-click the tab and choose Deploy Remote Agent, or run Deploy Remote Agent… from the command palette. The dialog opens with the session already filled in. Open Remote Window… (command palette, Session menu, or right-click a session in the session list) opens a separate NetStacks window connected to a remote agent.
Requirements
- The server must run Linux on x86_64 or aarch64.
- The agent is installed to
~/.netstacks/netstacks-agenton the server. NetStacks downloads the matching binary fromreleases.netstacks.netand checks its SHA-256 checksum before uploading it. - Your computer connects straight to the agent's HTTPS port on the server, not through the SSH session. That port must be reachable from your computer (no jump host or tunnel in between).
What NetStacks Saves
Your list of workspaces is saved in NetStacks. For local workspaces, NetStacks also keeps the layout in <folder>/.netstacks/workspace.json, so when you reopen a workspace you get back your open files, terminal tabs (the AI tool tab is relaunched), expanded folders and panel sizes.
When a local workspace opens, NetStacks:
- Creates the
.netstacks/folder and adds.netstacks/to.gitignore(creating.gitignoreif needed). - Clears
.netstacks/screenshots/, where pasted images are stored. Move any screenshot you want to keep out of that folder. - Writes an instructions file for your AI tool (for example
CLAUDE.md) if one does not exist yet. See the instructions file.
Settings → Workspaces
Open Settings and choose Workspaces. It has three sections:
- Workspace Defaults: the values the New Workspace dialog starts with.
- Git Accounts: see Git credentials.
- Language Features: language servers. See Language Support.
| Workspace Defaults field | What it does |
|---|---|
| Default AI Coding Tool | Tool preselected in New Workspace. Built-in default: Claude Code. |
| Custom AI Command | Command used when the tool is Custom. |
| Default Launch Arguments | Arguments added after the tool command. |
| Auto-launch AI tool when workspace opens | Default for the Auto-launch checkbox. |
| Default Terminal Panel Height (px) | Starting height of the bottom panel (default 250). |
| Default File Explorer Width (px) | Starting width of the file tree (default 220, range 150–500). |