
Connection Issues
Fix SSH and Telnet sessions that time out, fail authentication, stop at a host-key prompt, or fail through a jump host. Covers standalone Terminal and connections made through a NetStacks Controller.
Overview
Where an SSH connection starts depends on the mode you are in:
- Standalone (Personal Mode): the local agent bundled with the desktop app opens the SSH or Telnet connection from your computer. Credentials come from the session's Credential Profile and the local vault.
- Enterprise (connected to a Controller), including the web terminal at
/terminal/: the Controller opens the connection to the device. Your computer only needs to reach the Controller. Credentials stay on the Controller.
Errors appear in red inside the terminal tab. Find the message you see in the sections below. The quoted text is what NetStacks prints.
First Checks
- Can your machine reach the device? In standalone mode, open a Local Shell from the Sessions toolbar and test the port from the same computer, for example:On Windows,
nc -vz 10.0.0.1 22 # macOS / Linux ssh -v [email protected] # shows where the handshake stopsTest-NetConnection 10.0.0.1 -Port 22in PowerShell does the same port test. - Is the host and port right? Open the session's Settings... and check Host, Port and Protocol on the General tab.
- Does the session have the right Credential Profile? Every standalone session needs one. All authentication settings come from it.
- macOS only: did you allow Local Network access? On first launch NetStacks shows Local Network Access Required and macOS then asks for permission. If you clicked Don't Allow, devices on your local network are unreachable. Turn it back on in System Settings → Privacy & Security → Local Network.
Error Messages (Standalone Terminal)
In standalone mode a failed connection prints a line that starts with Error: SSH connection failed: followed by the reason. The common reasons are below.
Timeouts and unreachable hosts
| You see | What it means | What to do |
|---|---|---|
Connection failed: <host>:<port> - connection timed out after Ns | No SSH handshake finished in time. Usually a firewall or ACL dropping the packets, a wrong IP address, or a routing problem. | Test the port from the same machine (see First Checks). Check ACLs such asaccess-class on the VTY lines and any firewall between you and the device. |
Connection failed: <host>:<port> - ... with a "connection refused" reason (exact wording comes from your OS) | The device answered but nothing is listening on that port. | Check the port number and that SSH is enabled on the device (for example ip ssh version 2 and transport input ssh on Cisco IOS). |
Connection failed with a name-resolution (lookup) error | The hostname does not resolve from your computer. | Use the IP address, or fix DNS on your machine. |
NetStacks always offers older key-exchange, cipher, host-key and MAC algorithms (for example diffie-hellman-group1-sha1, ssh-rsa, ssh-dss and CBC ciphers) alongside modern ones. The strongest algorithm both sides support is used. You do not need to change anything to reach older IOS or ASA images.
Authentication failures
| You see | What to do |
|---|---|
Authentication failed: authentication failed - check credentials in profile | The device rejected the username, password or key. Open Settings → Profiles, edit the profile used by the session and re-enter the Username and password, or check the Key File Path. Make sure the account exists on the device or in its AAA server. |
Key error: failed to load key '<path>': ... | The private key file could not be read or decrypted. Check that the path in Key File Path exists on this computer and that Key Passphrase (optional) is correct for an encrypted key. |
Things to know about how NetStacks authenticates:
- A profile uses either Password or Public Key. For password profiles NetStacks tries keyboard-interactive first and then plain password, which covers devices such as Arista and many Cisco platforms.
- Keys are read from a file on disk. NetStacks does not use a running
ssh-agentand does not support SSH certificates in standalone mode. - For RSA keys NetStacks signs with
rsa-sha2-512, thenrsa-sha2-256.
Vault locked / no password stored
| You see | What to do |
|---|---|
Vault is locked. Go to Settings > Security to unlock. | The vault was locked with Lock Vault. Open Settings → Security, click Unlock Vault and enter your master password, then reconnect. |
No password stored. Edit profile to add password, then unlock vault in Settings > Security. | The profile is set to Password but has no password saved. Edit the profile in Settings → Profiles and enter the password. |
See Sign-In & Vault Problems if you cannot unlock the vault at all.
Host Key Prompts and Changed Keys
The first time you open an interactive SSH session to a host and port, NetStacks shows Confirm SSH host key with the SHA-256 fingerprint. If a known device presents a different key, the dialog title is SSH host key has CHANGED and it shows both the previously trusted key and the new one.
- The dialog auto-rejects after 120 seconds. If you step away, the connection fails and you need to reconnect.
- Reject stops the connection with
user rejected host key for <host>:<port>. - A changed key is expected after a device is re-imaged, its SSH keys are regenerated, or an IP address is reused by a different device. Confirm the new fingerprint with the device owner (for example with
show crypto key mypubkey rsaorshow ssh server host-keys) before clicking Trust New Key Anyway.
Clearing a stored key (standalone)
- Open Settings → Trusted Hosts.
- Filter for the host, then click Revoke on its entry. The next connection prompts again.
Trusted keys are stored in ~/.ssh/known_hosts (the same file OpenSSH uses), in NetStacks' own host:port type key format. NetStacks rewrites the file when it saves, so comments and @cert-authority or @revoked lines are not kept. Back up the file first if you rely on those entries.
Through a Controller
The Controller decides how host keys are handled, using the SSH Host Key Policy in Settings → Terminal Sessions of the admin console:
- Trust on First Use (recommended): new keys and key changes are accepted, and changes are logged to the audit trail.
- Trust on First Use — Strict: a changed key is blocked until an admin approves it. Ask your Controller administrator.
- Always Prompt User: you see the same host-key dialog in the Terminal for every new device.
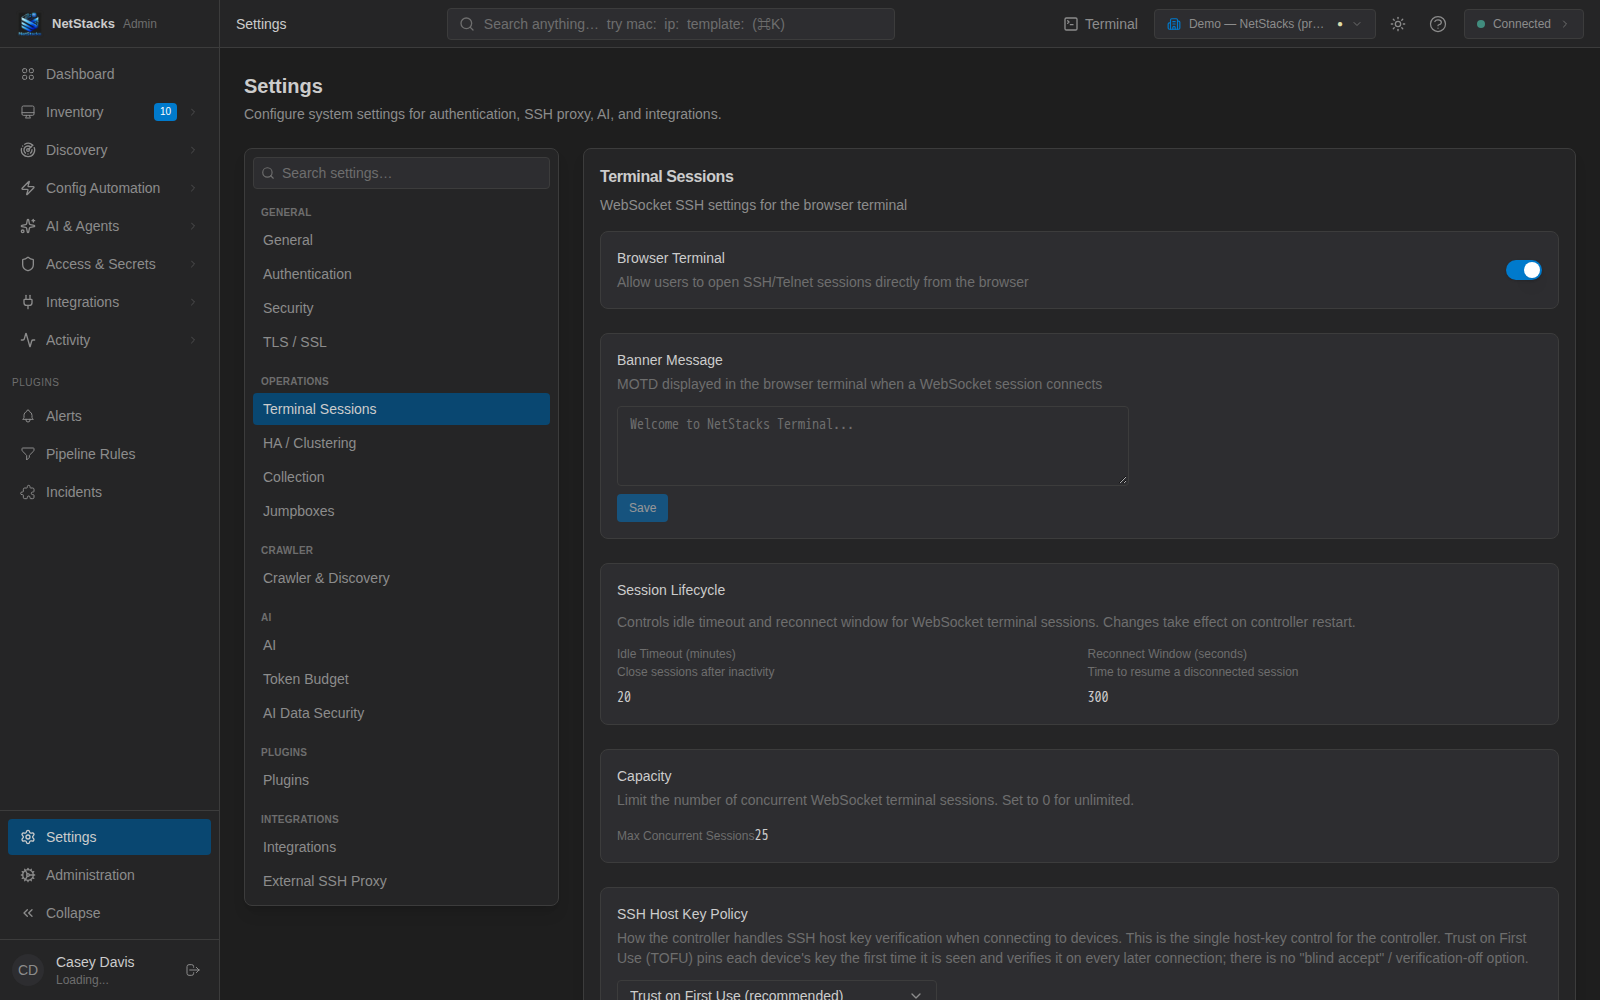
The Terminal Sessions settings also control the idle timeout, reconnect window and Max Concurrent Sessions for Controller sessions.
Jump Host Problems
Jump hosts (bastions) are a standalone feature. When you connect through a Controller, the Controller itself reaches the devices and jump hosts are not used.
| You see | What to do |
|---|---|
Jump host refused to open a tunnel to <host>:<port> (...). Check that the jump host permits TCP forwarding (AllowTcpForwarding yes). | You logged in to the bastion, but it would not forward to the device. Set AllowTcpForwarding yes in the bastion's sshd_config (or the matching Match block), and check that the bastion can reach the device's IP and port. |
An error containing Jump hosts cannot be chained when saving | NetStacks supports one hop. A session used as a jump cannot itself use a jump. Point the session at a jump that connects directly. |
| The jump works but authentication to the device fails | Each hop uses its own credentials. The jump uses the profile set on the Jump Host (or on the session used as jump); the device uses the session's own profile. |
A jump applies to interactive SSH sessions, their port forwards and tunnels. It does not apply to:
- Telnet sessions.
- SFTP. The file browser connects straight to the device, so the device must be reachable directly from your computer.
- Quick Connect.
A session's jump comes from, in order: the session's Jump (Bastion) setting, then the profile's Default Jump, then a direct connection.
Telnet Sessions
- Telnet works for saved sessions in standalone mode: set Protocol to Telnet on the session's General tab. Quick Connect is SSH only.
- NetStacks types the profile's username when the device prints a prompt ending in
Username:,login:,user:oruser name:, and the password after a prompt ending inPassword:orsecret:. If your device uses a different prompt, log in by hand. - A connection error shows as
Telnet connection failed: .... Check that port 23 (or your custom port) is open and Telnet is enabled on the VTY lines. - If you exported and re-imported sessions, check the protocol: session exports do not keep the protocol, so Telnet sessions come back as SSH.
Dropped Sessions and Reconnect
When a standalone session that was connected closes, the terminal shows Connection Lost with a countdown ("Reconnecting in N seconds..."). Use Reconnect Now, Cancel, or Don't auto-reconnect this session. You can also press Cmd/Ctrl+Shift+R to reconnect a tab.
- The delay comes from the session's Reconnect Delay (default 5 seconds). Auto-reconnect is set per session on the Terminal tab of the session settings.
- If idle sessions drop, check the profile's Keepalive Interval (seconds) (default 30). It is sent as an SSH keepalive. A value of 0 turns keepalives off. Keepalives are not sent on sessions that go through a jump host, so a short idle timeout on the device or a firewall can close those.
- Through a Controller, the Terminal retries on its own and resumes the same session if it reconnects within the Controller's Reconnect Window (seconds) (default 300). The Controller also closes sessions after its Idle Timeout (minutes).
SFTP Will Not Connect
If the terminal session works but the file browser shows Failed to connect SFTP:
- SFTP connects directly to the device, not through a jump host. The device must be reachable from your computer.
- SFTP uses plain password authentication. Devices that only accept keyboard-interactive logins can work in the terminal but refuse SFTP.
- The device's SSH server must offer the SFTP subsystem. Some network operating systems need SFTP enabled separately from SSH.
- Through a Controller, pick a specific profile in the Connect to dialog before opening the file browser, and make sure the admin has the SFTP File Browser setting turned on.
Errors When Connecting Through a Controller Enterprise
In enterprise mode and in the web terminal, the tab shows Connecting to <host>... and then Connected to <host> via Controller. A via <Controller name> badge sits in the top-right corner of the terminal. If it fails, the tab prints Error: <message>.
| Message | Cause | Fix |
|---|---|---|
No device matches host; connect is device-anchored | The Controller only connects to devices in its inventory. The host you tried is not a device in your organization. | Connect from the Devices panel, or ask an admin to add the device to the inventory. |
Device has no profile assigned and you have no default connection profile set | No credentials could be chosen for the device. | Pick a profile in the Connect to dialog, set a Default connection profile in Settings → Account → My Profiles, or ask an admin to assign a profile to the device. |
Access denied to device profile | The profile is not shared with you or your role. | Ask an admin to grant you access to the profile. |
Maximum concurrent sessions reached | The Controller's Max Concurrent Sessions limit is reached. | Close unused tabs, or ask an admin to raise the limit. |
An authentication message followed by Check the session's credentials with your administrator | The device rejected the credentials stored on the Controller. | Ask the owner of the profile to update its secret. |
Settings → Account shows which Controller user you are signed in as and your My Profiles. If you have no profiles there, an administrator has to create or share one before you can connect to devices that have no profile assigned.
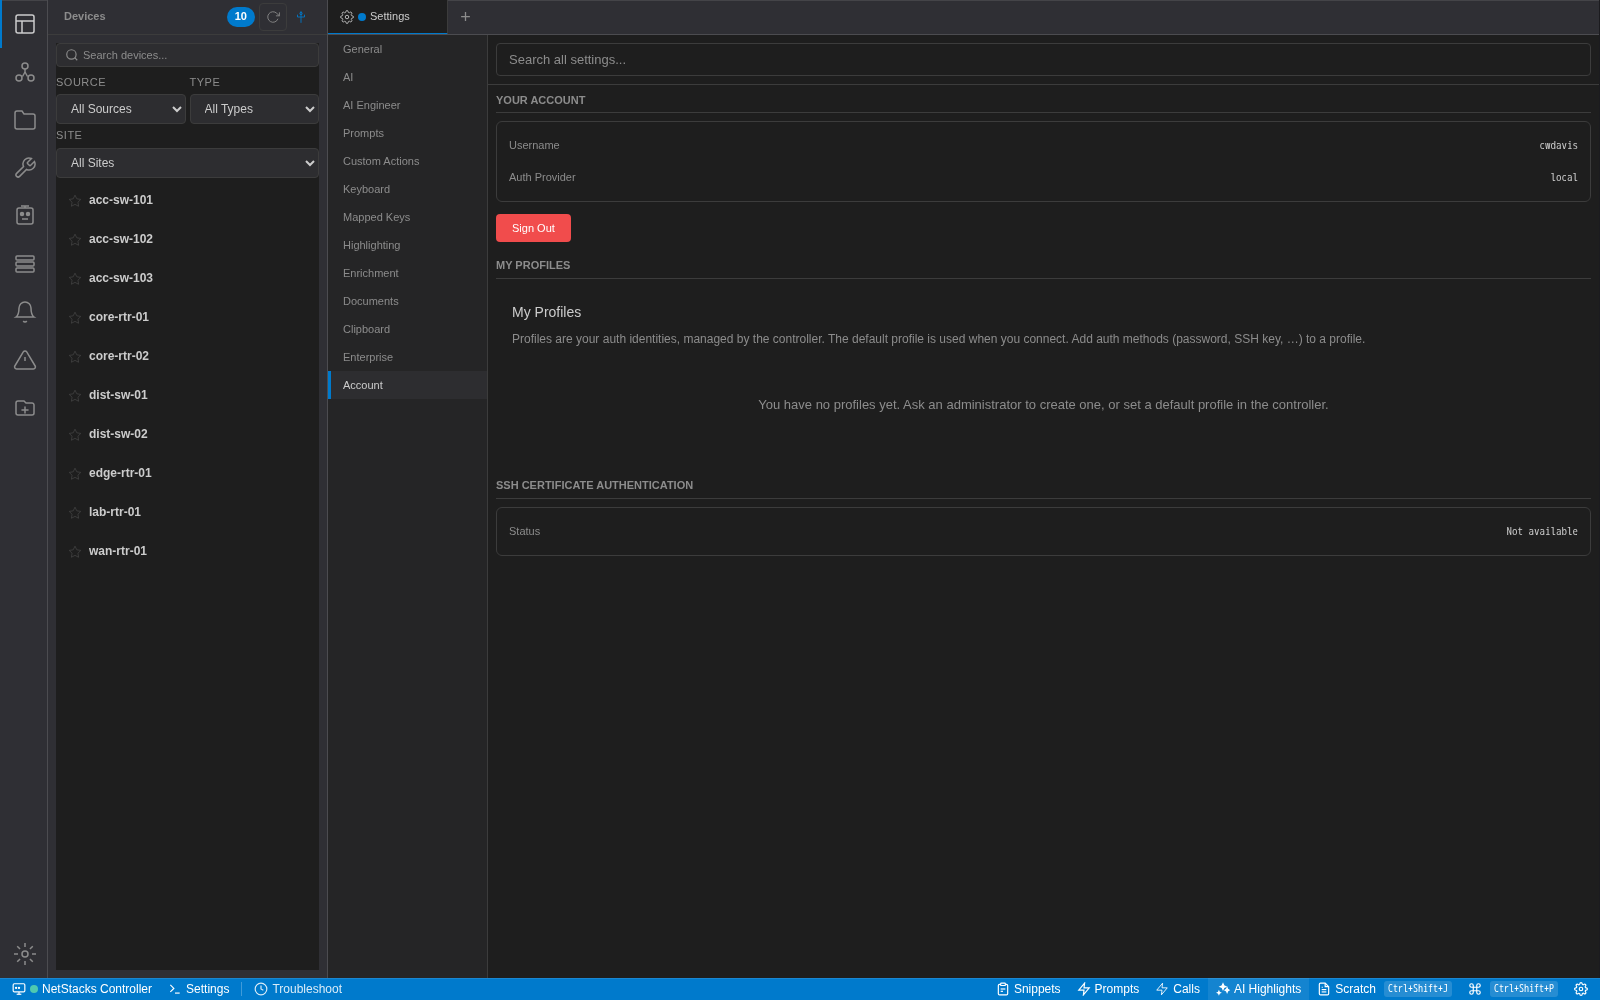
The connection starts on the Controller host, so the Controller must be able to reach the device. Test from the Controller host (for example nc -vz <device-ip> 22) and check firewalls between the Controller and the device network.
If the whole Terminal cannot reach the Controller (a Cannot Connect screen instead of the sign-in form), see Controller Certificate Errors.