
Connecting to Devices
Open SSH and Telnet sessions in NetStacks: saved sessions and credential profiles in the standalone app, the Devices list and Connect dialog in enterprise mode, Quick Connect, auto-commands and reconnect.
Overview
How you connect depends on the mode NetStacks is running in:
- Standalone: you create sessions (host, port, protocol) that use a credential profile for the username and password or key. Connections go straight from your computer to the device.
- Enterprise: you pick a device from the Controller's inventory in the Devices sidebar. The Controller makes the SSH connection using credentials from its vault; you never see the secret.
Standalone: Saved Sessions
Every standalone SSH or Telnet connection is a saved session, and every session takes its login from a credential profile. Create the profile first.
1. Create a Credential Profile
- Open Settings → Profiles and click Create Profile. (You can also click New profile inside the session dialog.)
- On the Auth tab, enter a Profile Name (for example “Cisco Production”) and Username.
- Choose Auth Type:
- Password — stored encrypted in the local vault.
- Public Key — enter the Key File Path (for example
~/.ssh/id_ed25519) and an optional Key Passphrase. NetStacks reads an existing key file; it does not generate keys.
- Optionally, on the Connection tab set the Default Port, the Keepalive Interval (seconds) (default 30, 0 turns keepalives off) and a Default Jump host.
- Optionally, on the Terminal tab set a default theme, font and font size for sessions that use this profile, and Auto Commands on Connect.
- Save the profile.
See SSH Passwords & Keys for more on profiles and the vault. If the vault is locked, connections fail with “Vault is locked. Go to Settings > Security to unlock.”
2. Create a Session
- Open the Sessions sidebar and click the + button (tooltip New Session), or right-click a folder and choose New Session in Folder.
- On the General tab enter a Session Name, pick the Protocol (SSH or Telnet), and enter the Host (IP or hostname) and Port. Switching the protocol sets the port to 22 or 23.
- On the SSH tab (labelled Auth for Telnet) choose the Credential Profile. The hint under it shows which username and auth type will be used.
- Optionally fill in the Console tab (see Out-of-Band Console) and the Terminal tab.
- Click Save.
To edit a session later, right-click it in the sidebar and choose Settings..., or right-click its terminal tab and choose Session Settings. The dialog title reads Edit Session: <name>.
3. Connect
- Double-click the session in the sidebar, or right-click it and choose Connect or Connect in New Tab.
- Select several sessions (⌘/Ctrl-click to toggle, Shift-click for a range), then right-click → Connect All (N), or press ⌘⇧Enter / Ctrl+Shift+Enter.
The first time you connect to an SSH host you are asked to confirm its host key (see Host Key Verification). Sessions that go through a jump host show a via <jump name> badge in the terminal.
See Organizing Sessions for folders, favorites, recent connections and import/export.
Session Settings Reference
General tab
| Field | Notes |
|---|---|
| Session Name | Required. |
| Protocol | SSH (default) or Telnet. |
| Host / Port | Required. Port 1–65535, default 22. |
| Folder | Shown once at least one folder exists. |
SSH tab
| Field | Notes |
|---|---|
| Credential Profile | Required. All authentication comes from the profile. |
| Jump (Bastion) | Connect through another saved session or a Jump Host record, or inherit the profile's default. See Jump Hosts. |
| Port Forwarding | Local (-L) and Dynamic (-D) forwards that start and stop with the session. See SSH Tunnels. |
| SFTP Starting Directory | Folder the SFTP browser opens in, for example /var/log or disk0:/. Leave empty to choose by device type. |
Terminal tab
| Field | Default | Notes |
|---|---|---|
| Auto-Reconnect | On | Reconnect automatically after an unexpected disconnect. |
| Reconnect Delay (seconds) | 5 | 1–60. |
| Scrollback Lines | 10000 | 100–100000. |
| Auto Commands on Connect | — | Commands sent one at a time after login, each once a prompt ending in >, #, $ or % appears. Typical: terminal length 0. Works for SSH and Telnet. A session's own list replaces the profile's list. |
| CLI Flavor | Auto-detect | Linux/Unix Shell, Cisco IOS/IOS-XE, Cisco IOS-XR, Cisco NX-OS, Juniper Junos, Arista EOS, Palo Alto PAN-OS, Fortinet FortiOS. Used by the AI, paste presets and the SFTP starting folder. |
| Terminal Theme, Font Family, Font Size | Default | Per-session overrides of the global settings. See Themes & Appearance. |
The Context and Device Memory tabs appear once the session is saved. See Device Context and Device Memory.
Quick Connect
Quick Connect is a short form for connecting to a new SSH host (standalone).
- Press ⌘⇧Q / Ctrl+Shift+Q (or ⌘N / Ctrl+N), or choose File → Quick Connect….
- Enter the Host and Port and pick a Credential Profile. Click an entry under Recent Connections to fill these in.
- Click Connect & Save..., accept or change the suggested name (
user@host), and click Save & Connect.
Quick Connect is SSH only and connects directly (no jump host). For Telnet or a jump host, create the session from the sidebar.
Telnet Sessions
Set Protocol to Telnet in the session dialog (standalone only). NetStacks then logs in for you using the session's credential profile:
- The username is sent when the output ends with
username:,login:,user:oruser name:(case-insensitive). - The password is sent after that, when the output ends with
password:orsecret:.
Telnet sessions do not use jump hosts. Window size changes are sent to the device (NAWS).
Enterprise: Devices and the Connect Dialog Enterprise
When NetStacks is signed in to a Controller (including the web terminal), the Sessions icon opens the Devices sidebar: every device in your organization's inventory.
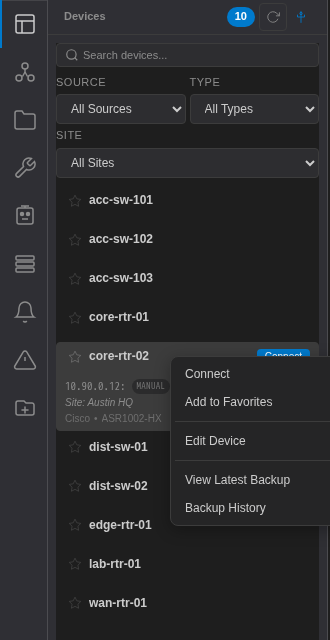
The Devices sidebar. Use Search devices... and the Source, Type and Site filters to narrow the list. Right-click a device for Connect, Add to Favorites, Edit Device, View Latest Backup and Backup History.
Connect to a device
- Click the device in the list.
- In the Connect to <device> dialog, check the host and description, and choose a profile under Select Profile:.
- Click Connect. The tab opens and the terminal shows “Connected to <host> via Controller” with a via <Controller name> badge.
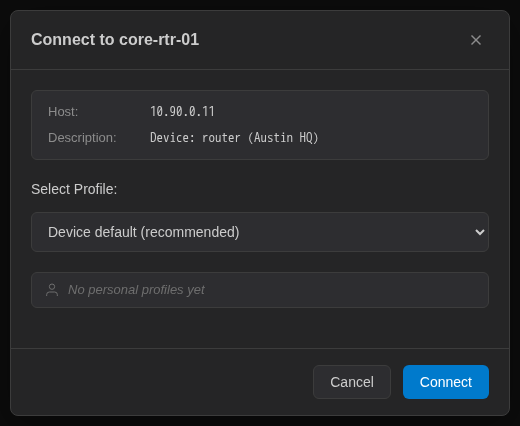
The Connect dialog. Device default (recommended) uses the profile assigned to the device on the Controller.
Hovering a device row also shows a quick-connect button (tooltip Connect with default credential) that skips the dialog. Star a device to pin it to the Favorites section; favorites are saved in this browser or app only.
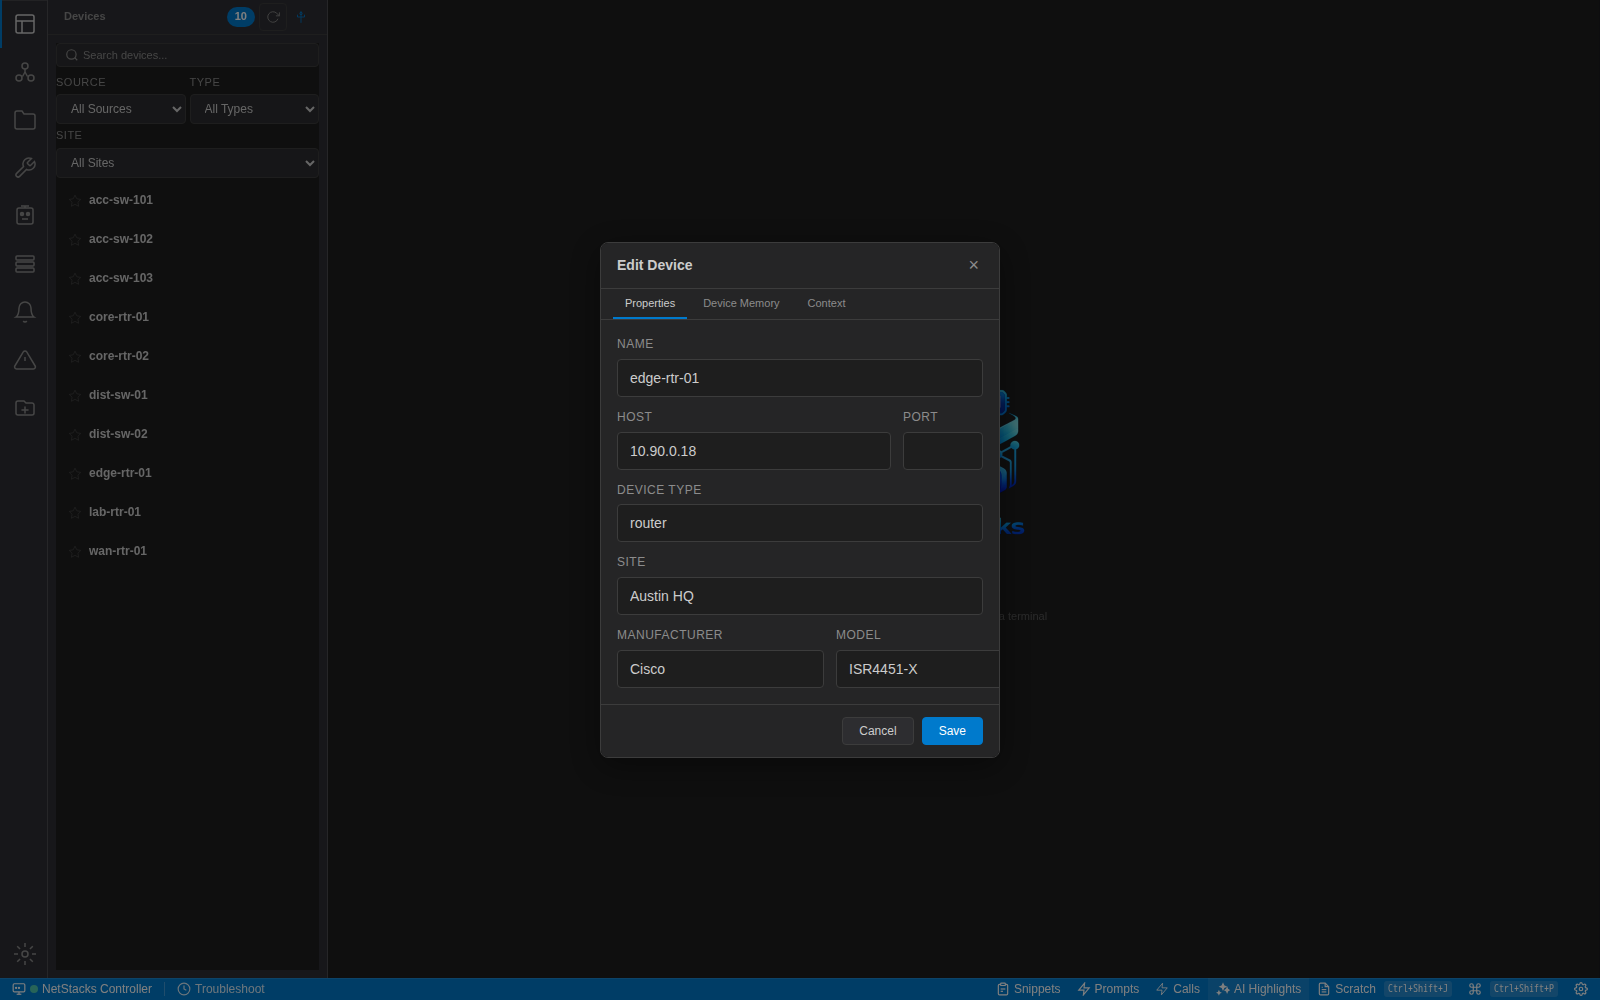
Edit Device opens a dialog with Properties (Name, Host, Port, Device Type, Site, Manufacturer, Model), Device Memory and Context tabs. Saving Properties updates the device in the Controller inventory.
Which Credentials Are Used Enterprise
The profile list in the Connect dialog has Device default (recommended) followed by groups for My Profiles, Shared and Service. Each entry shows the name, username and auth type (Password, SSH Key or Certificate). Your choice applies to that tab only.
When you choose the device default, the Controller picks:
- the profile assigned to the device, or
- your own Default connection profile (Settings → Account → My Profiles), or
- fails with “Device has no profile assigned and you have no default connection profile set”.
Your role must grant access to the profile; otherwise the connection fails with “Access denied to device profile”. Certificate profiles get a short-lived SSH certificate signed by the Controller at connect time. See SSH Certificates.
New Terminal = Jumpbox Enterprise
In enterprise mode, New Terminal (⌘T / Ctrl+T or the tab-strip +) opens a shell inside your personal jumpbox container on the Controller, titled “Local Shell”. The terminal shows “Starting jumpbox container...” the first time. It is not a shell on your own computer. Administrators manage jumpbox containers in the Controller admin console under Jumpboxes.
Reconnecting
Standalone: when a connected session drops, a Connection Lost overlay counts down (“ Reconnecting in N seconds...”) using the session's Reconnect Delay, and retries until it succeeds. The overlay has Reconnect Now, Cancel and Don't auto-reconnect this session (turn it back on in Session Settings → Terminal).
Enterprise: the terminal retries with increasing delays (up to 10 attempts) and resumes the same session on the Controller if it reconnects within the Controller's reconnect window (5 minutes by default).
Reconnect manually at any time with ⌘⇧R / Ctrl+Shift+R or the tab menu's Reconnect.
Troubleshooting
| Symptom | What to check |
|---|---|
| “authentication failed” | Check the profile's username and password or key path. Key files must be readable by NetStacks; encrypted keys need the passphrase. |
| “Vault is locked” | Unlock the vault in Settings → Security. |
| Connection times out | NetStacks waits 15 seconds for an SSH connection. Check routing and ACLs from your machine (standalone) or from the Controller (enterprise). |
| “No device matches host; connect is device-anchored” | Enterprise: the host is not in the Controller's inventory. |
| “Maximum concurrent sessions reached” | Enterprise: the Controller's session limit is reached. Close other sessions or ask your administrator. |
| “Check the session's credentials with your administrator” | Enterprise: the Controller profile was rejected by the device. Try another profile in the Connect dialog. |
More in Connection Troubleshooting.