
NetBox Integration
Import devices from NetBox into the standalone Terminal as sessions, or sync them into the NetStacks Controller's central inventory.
Overview
NetStacks reads devices from NetBox's DCIM API using a NetBox URL and API token. It never writes to NetBox. There are two separate integrations:
- Standalone Terminal — NetBox sources under Settings → Integrations create local sessions.
- Controller — a NetBox integration under the admin console's Settings → Integrations creates and updates Managed Devices for the whole organization.
Both are run manually: you trigger an import or sync when you want fresh data.
Standalone Terminal
In personal mode NetBox is set up as an API Resource (the NetBox URL and API token, stored encrypted in your vault) wrapped by a NetBox source that holds your mapping rules and filters. The onboarding wizard's Connect NetBox (optional) step walks you through the same setup. These screens exist only in the desktop app in standalone mode, so they are described here by label.
Add a NetBox Source
- Create an API Resource with your NetBox URL and token (Settings → API Resources).
- Open Settings → Integrations and, under NetBox Sources, click Add NetBox Source.
- In Connection, enter a Name, pick the NetBox API Resource, and click Test Connection.
- Choose a Default Profile and, optionally, Profile Mappings By Site or By Role.
- Optionally add CLI Flavor Mappings By Manufacturer or By Platform.
- Optionally configure Console Access: a terminal server profile, default console protocol, and mappings by console server manufacturer.
- Narrow the import with Device Filters: Sites, Roles, Vendors, Platforms, Statuses (Active, Planned, Staged, Failed, Inventory, Decommissioning, Offline) and Tags. Filters combine with AND between categories and OR within a category; the dialog shows how many devices match as you change them.
- Save the source.
Import Devices
Click Sync on the source row to open Import from NetBox. The dialog has three steps — Source, Filter, Import:
- Source: Use Saved Source, or Enter Manually with a NetBox URL and API token.
- Filter: optional Site and Device Role filters, and the Credential Profile for new sessions.
- Import: click Import Devices. The report lists sessions Created, Skipped and Errored; use Copy report to keep it.
Running the import again only adds devices that are new. Existing sessions are left alone, except that you can tick Update console access on already-imported sessions to refresh their console settings. Nothing is deleted.
How Devices Are Mapped
| Session field | Taken from NetBox |
|---|---|
| Name | Device name |
| Host | Primary IP (prefix length removed). Devices without a primary IP are skipped. |
| Folder | Site name (or Unsorted) |
| Credential profile | Role mapping, then site mapping, then the default profile. Devices with no matching profile are skipped. |
| CLI flavor | Platform mapping, then manufacturer mapping, then Auto-detect |
| Console access | The device's console port cabled to a console server. The TCP port comes from the NetBox custom field device_console. |
Controller Enterprise
On the Controller, NetBox syncs devices straight into the organization's Managed Devices inventory, so every user and every connected Terminal sees them.
Add a NetBox Integration Enterprise
- Make sure a Default Profile ID is set under Settings → Crawler & Discovery → Device manage / unmanage. Every device synced from NetBox is assigned that profile.
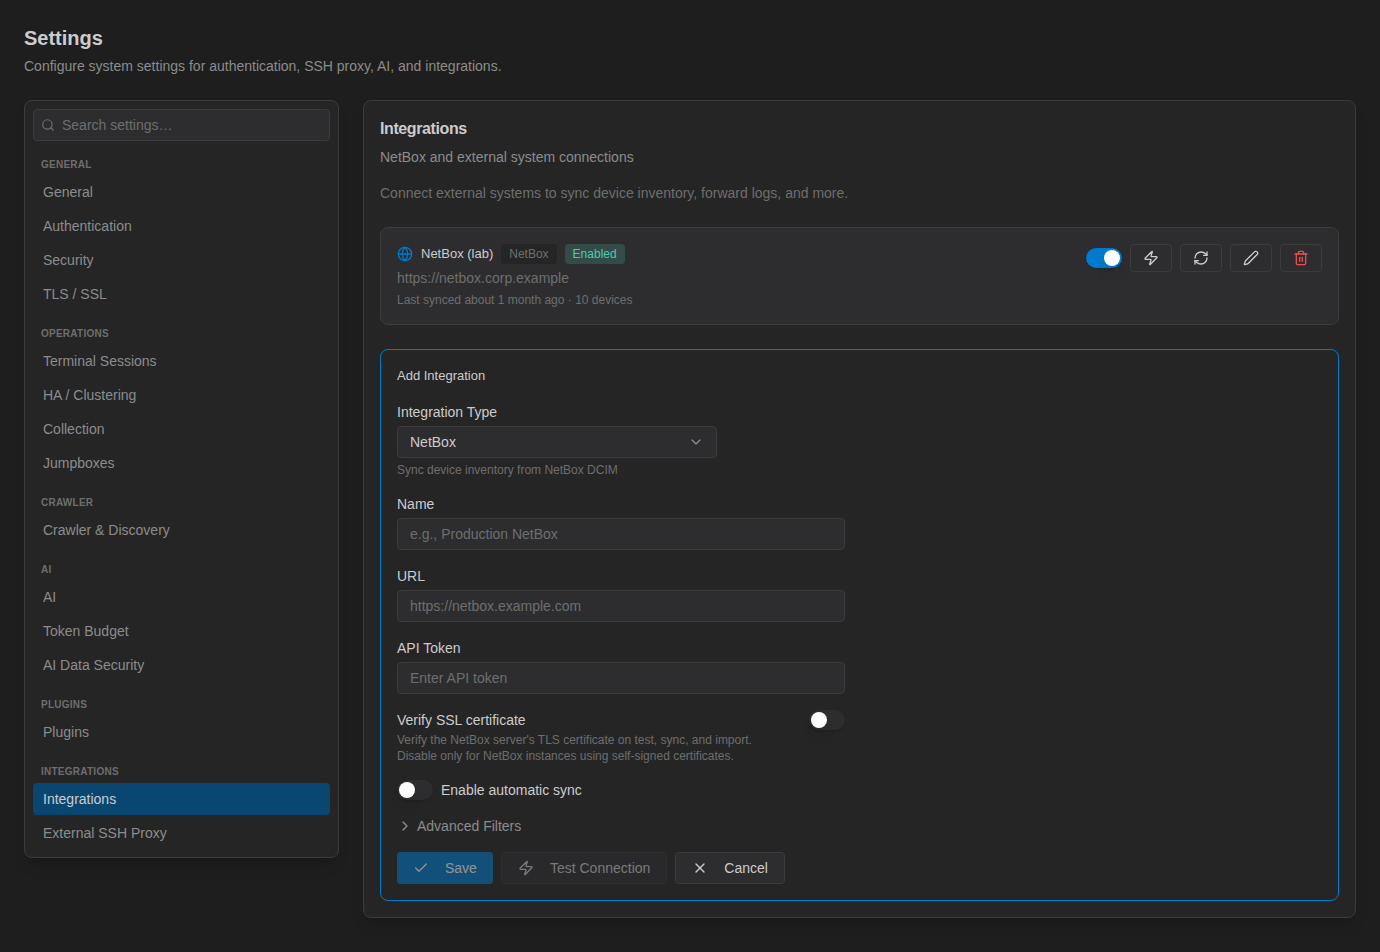
- Open Settings → Integrations and click Add Integration.
- Leave Integration Type as NetBox, and enter a Name, the NetBox URL and an API Token.
- Turn on Verify SSL certificate unless your NetBox uses a self-signed certificate.
- Click Test Connection. A working connection reports how many devices it found.
- Click Save.
Expand Advanced Filters to sync only part of NetBox. Each field is passed to the NetBox device API: Site, Manufacturer, Role, Tag and Status (use NetBox slugs, for example dc1, cisco, active), Only devices with primary IP (on by default), and Custom Filters for any other NetBox query parameters, joined with & (for example region=us-east&tenant=acme).
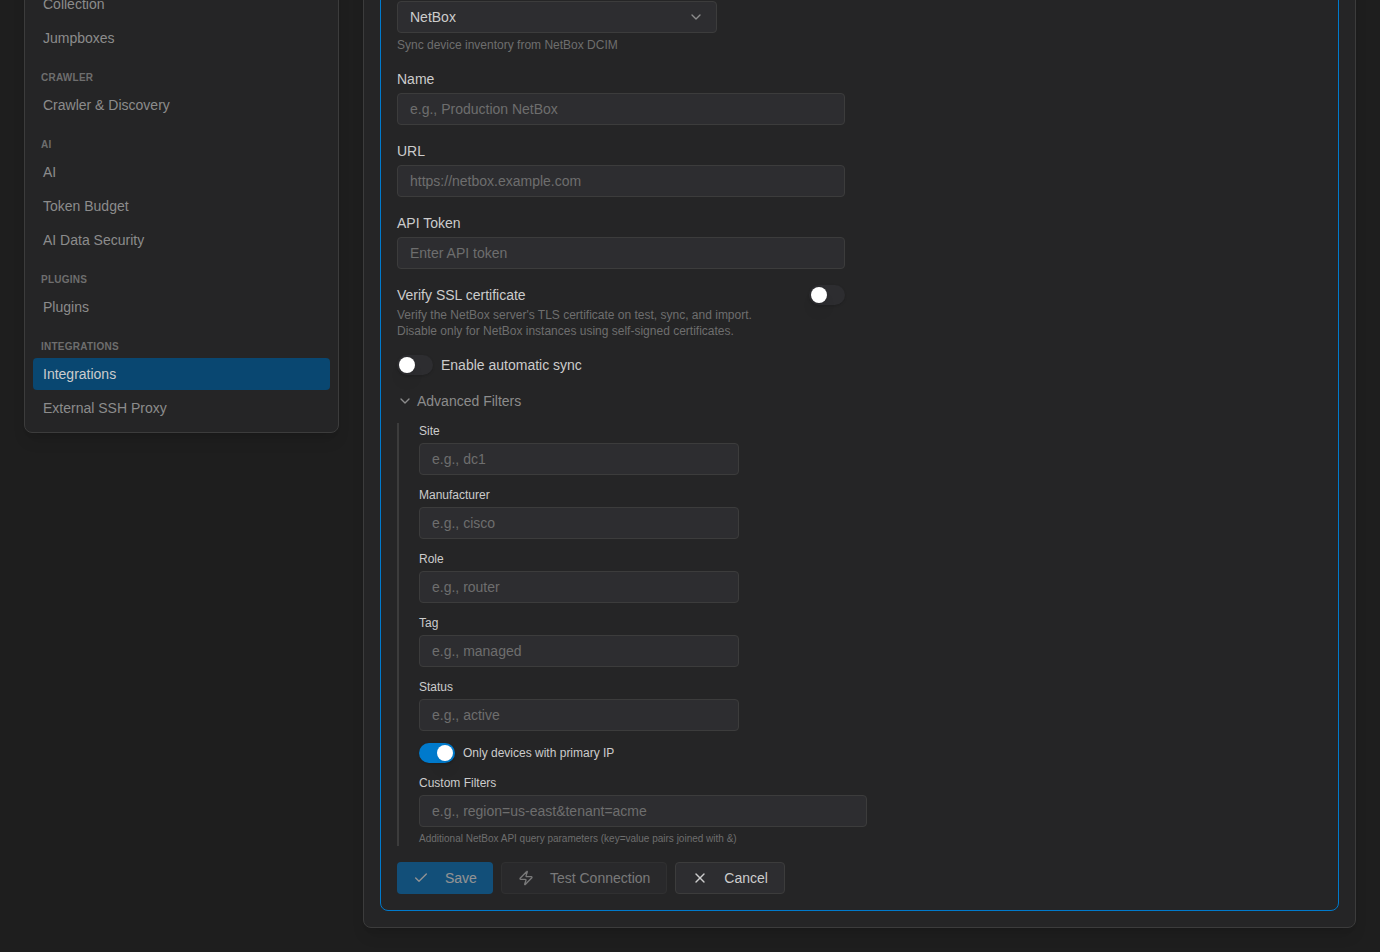
When editing an integration the token field reads leave blank to keep existing; the saved token is never shown again.
Run a Sync Enterprise
Each integration appears as a card with its URL, status badges and “Last synced … · N devices”. The icon buttons are Test connection, Sync now, Edit and Delete; the switch enables or disables the integration.
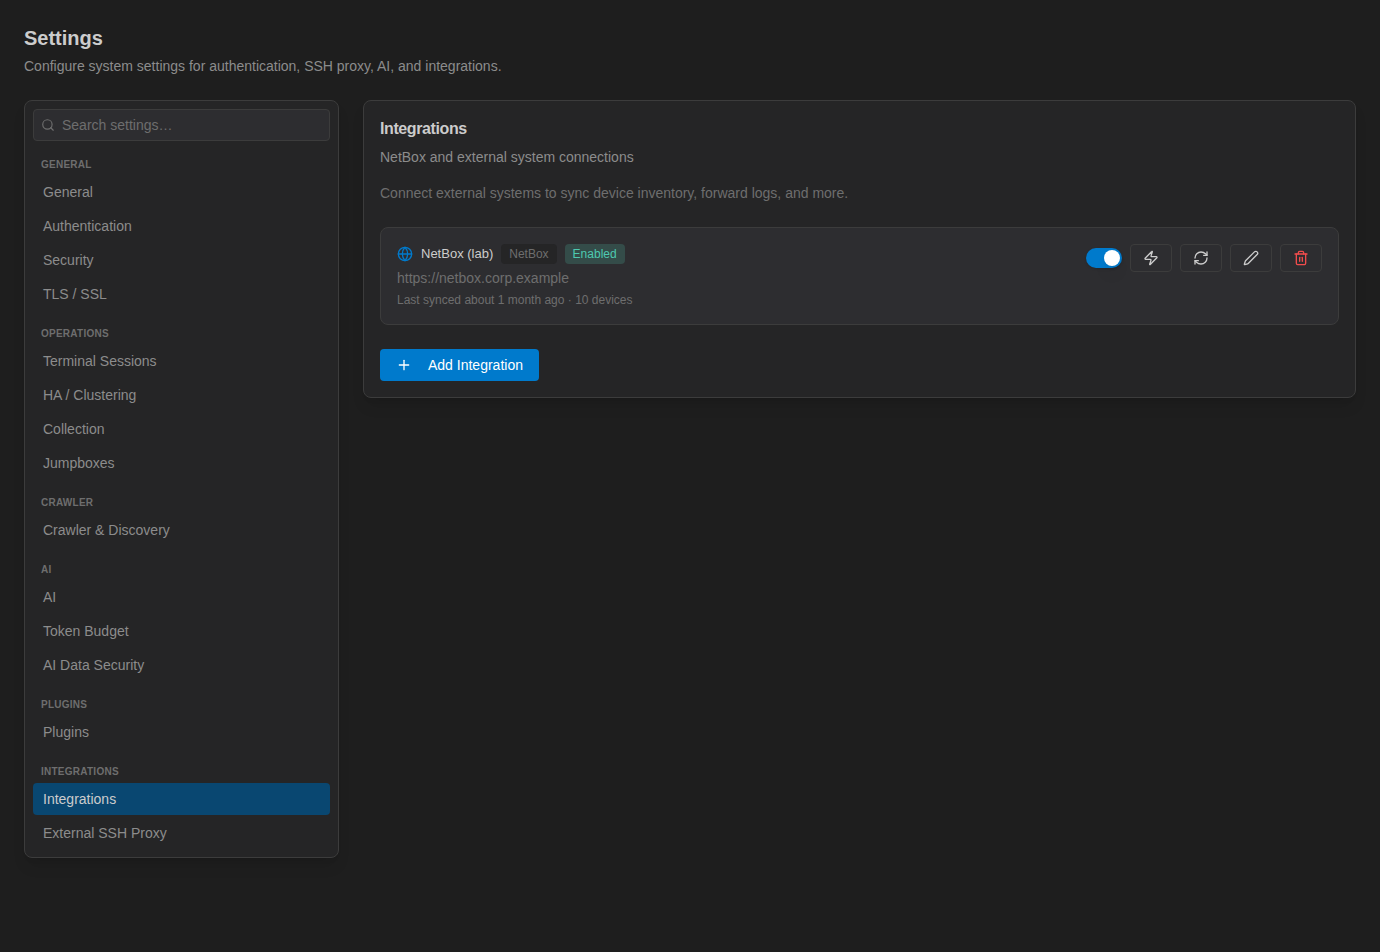
Click Sync now to pull devices. The result reads “Synced: X added, Y updated” (plus any failures). Sync runs only when you click it — scheduled automatic sync is not yet supported, so sync again whenever NetBox changes.
- Each sync overwrites the name, host, device type, manufacturer, model, platform, site, serial number and tags of devices that came from NetBox. Edit those fields in NetBox, not in NetStacks.
- Devices deleted in NetBox are not removed from the Controller. Unmanage them yourself.
- The sync also creates Sites for NetBox site names and links the devices to them.
Field Mapping Enterprise
| NetBox | NetStacks device |
|---|---|
| Device ID | Used to match the same device on later syncs |
| Name | Name |
| Primary IP (prefix removed) | Host. Devices without a primary IP fail. |
| Platform slug | Device type (generic if no platform) |
| Platform | Platform. Arista, IOS-XR, Junos and PAN-OS platforms map to the matching structured platform. |
| Device type manufacturer / model | Manufacturer / Model |
| Site | Site (and a linked Site record) |
| Serial | Serial number |
| Tags | Tags |
Seeding Discovery from NetBox Enterprise
Separately from the inventory sync, the NetStacks Crawler can take a one-time list of IPs from NetBox (or any JSON API) and queue them for discovery. Open Settings → Crawler & Discovery → Import, enter the Request URL (with any NetBox filters in the query string), an optional auth header (for NetBox: Authorization / Token <your token>), and the JSON extraction path (default results[].primary_ip.address), then click Fetch. The auth header value is not saved.
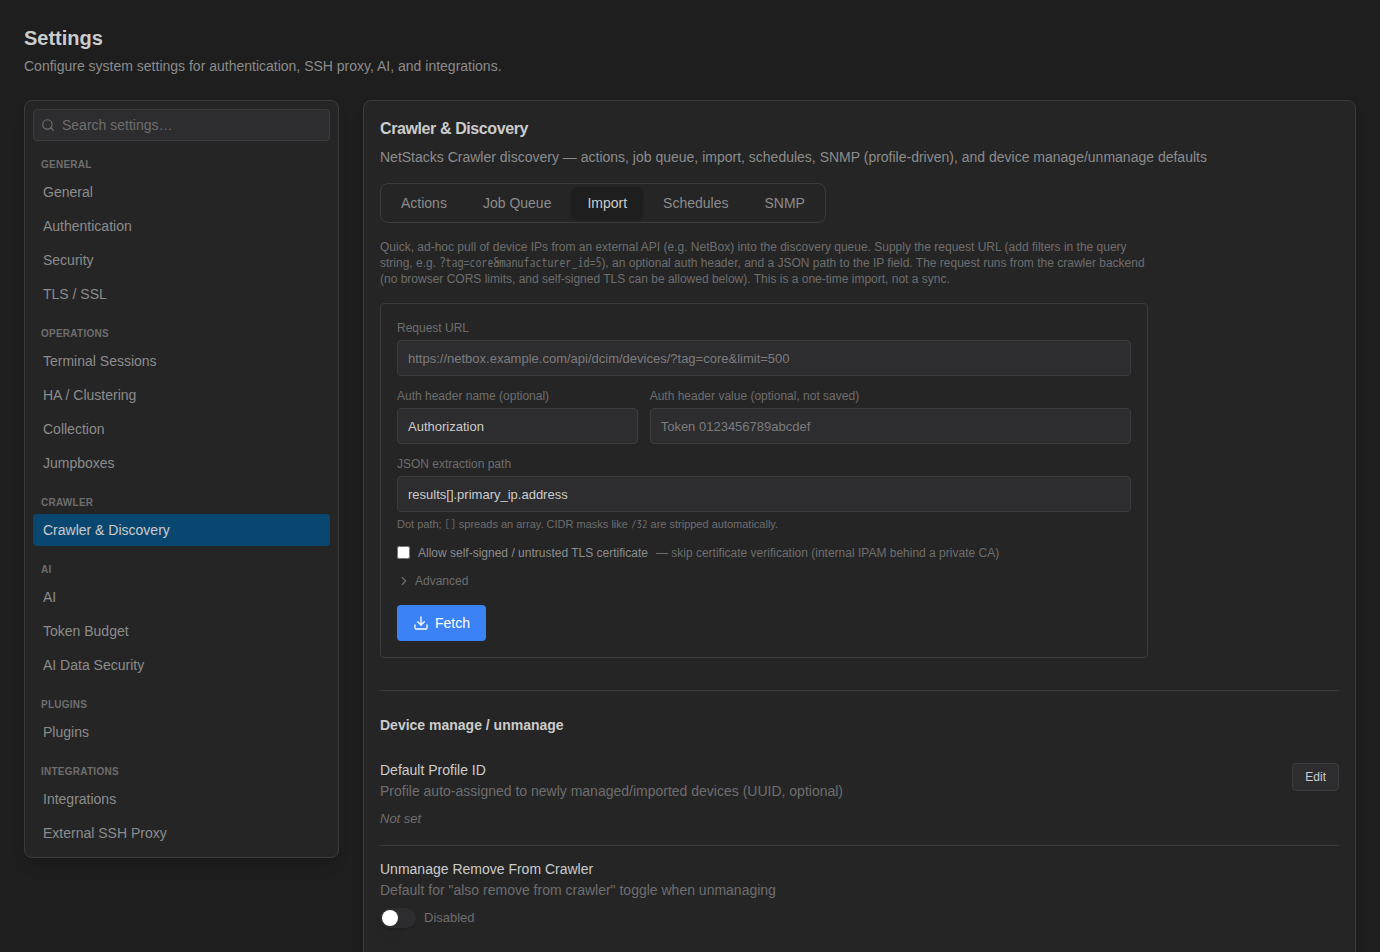
Discovered devices still need to be managed to join the inventory. See Network Discovery.
Troubleshooting
| Problem | Fix |
|---|---|
| Test Connection fails | Check the URL (no trailing /api), that the token is valid and has read access to DCIM, and that the Controller or your machine can reach NetBox. For self-signed certificates turn off certificate verification. |
| Controller sync fails with a profile error | Set the Default Profile ID under Settings → Crawler & Discovery. |
| Device “has no primary IP” | Assign a primary IPv4/IPv6 address in NetBox, or keep Only devices with primary IP on to skip such devices. |
| Standalone import skips devices | The device has no primary IP or no profile mapping matched. Set a Default Profile on the source. |
| Fewer devices than expected | Review the filters; slugs must match NetBox exactly. |