Recording, Logging & Saving Output
Capture terminal sessions in NetStacks: asciicast session recordings with playback, plain-text session logs, Save Output to Docs, inline capture to documents, and troubleshooting sessions.
Which Tool to Use
| Tool | Captures | Result | Mode |
|---|---|---|---|
| Session logging | All output from start to stop, as plain text | A document in Docs → Outputs → logs | Both |
| Save Output to Docs | The current terminal buffer, once | A document at a path you choose | Both |
| Session recording | Output and keystrokes with timing | An asciicast .cast file you can replay | Standalone |
| Troubleshooting session | Commands and output across chosen terminals, plus AI chat | An AI-written summary document | Standalone |
Session Logging
- Right-click inside the terminal and choose Start Session Logging. A LOG badge appears at the top of the terminal.
- Work as normal.
- Right-click again and choose Stop Session Logging.
When you stop, the log is saved as a document named Session Log - <session> - <date time> in Docs (Outputs, logs folder). Logs are plain text with color codes stripped.
In the standalone app, the raw file is also kept at ~/Documents/NetStacks/logs/ (hover the LOG badge to see the path), and Settings → Session Logs (or Tools → Session Logs…) lists your logs with View, Export (downloads a .log file) and Delete.
Save Output to Docs
- Right-click inside the terminal and choose Save Output to Docs..., or press ⌘⇧S / Ctrl+Shift+S.
- In Save Terminal Output to Docs, enter a Document Path after the fixed
docs/prefix, for exampleconfigs/site-a/router1. Slashes create folders. - Check the line and character count and click Save.
Inline Capture with |>
In the standalone app you can send one command's output straight to a document by adding a capture suffix when you type the command:
show running-config |> docs/configs/router1— save (overwrite) the output to that document.show log |>> docs/logs/router1— append to the document.
While a capture is running, press ⌘D / Ctrl+D to finish it or Esc to cancel.
Session Recording
A recording captures everything shown in the terminal with its timing, so it can be replayed later like a video. Recordings use the asciinema asciicast v2 format (.cast).
- Right-click inside the terminal (not on the tab) and choose Start Recording. A red REC badge appears.
- Right-click and choose Stop Recording when done.
Recordings are named Recording <date time>; rename them in the library. There is no keyboard shortcut for recording (⌘⇧R / Ctrl+Shift+R is Reconnect). Files are stored in ~/Documents/NetStacks/recordings/, and a link document is added to Docs (Outputs, recordings folder) that plays the recording when opened.
.cast files as sensitive and review them before sharing.Recordings Library and Playback
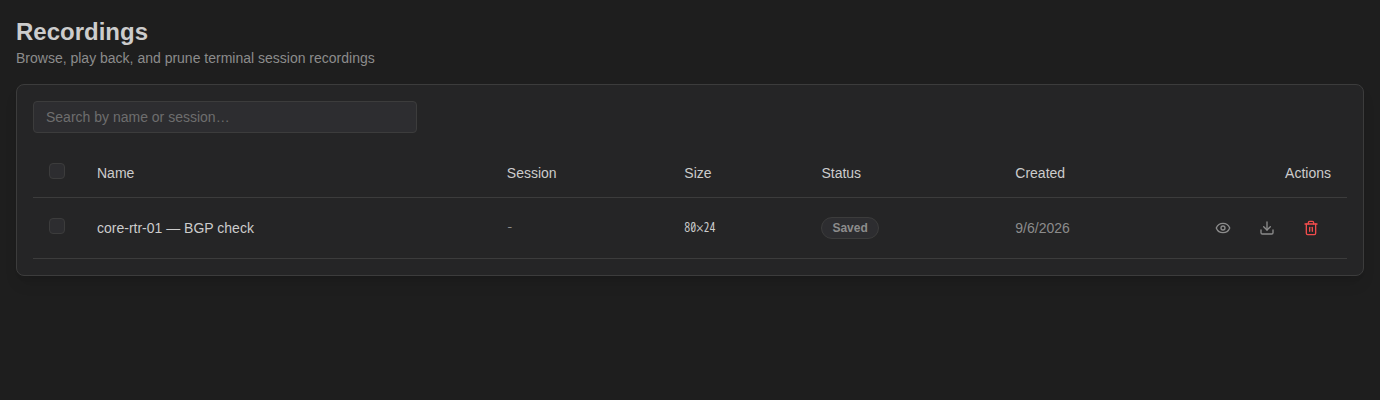
Open Settings → Recordings (or Tools → Recordings…). Each row shows the name, date, duration and terminal size, with:
- Play — opens the player.
- Rename.
- Share — downloads the recording as a
.castfile, playable with asciinema. - Delete.
The player has Play/Pause, Stop, a progress bar you can click to seek, the elapsed and total time, and speeds of 0.5x, 1x, 1.5x, 2x and 4x.
Troubleshooting Sessions
A troubleshooting session records the commands and output from one or more connected terminals while you work an issue, then asks the AI to write it up as a structured document.
- Click Troubleshoot in the status bar, or press ⌘⇧K / Ctrl+Shift+K.
- Enter a Session Name, tick the terminals under Terminals to Capture, and choose whether to Include AI conversations in recording.
- Click Start Recording. A status-bar indicator shows the session is running; click it for options, including Attach Topology.
- Click End & Generate Report. The summary is saved to Docs.
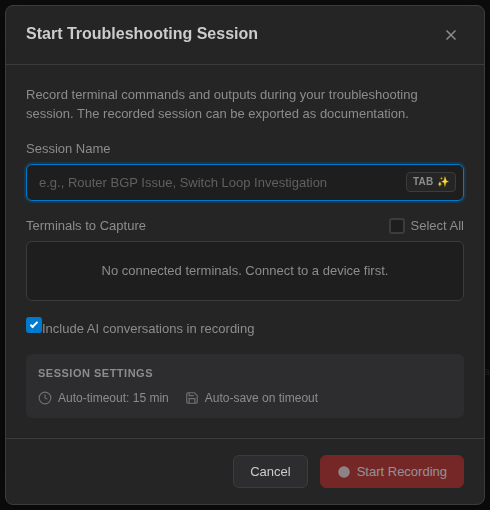
Sessions end automatically after a period of inactivity (15 minutes by default) and are saved. Change this in Settings → Troubleshooting (Inactivity Timeout, Auto-save on Timeout, Capture AI Conversations).
Enterprise Notes Enterprise
In enterprise mode and the web terminal, session logging and Save Output to Docs work as described and are stored on the Controller. The Recordings and Session Logs settings tabs are hidden.
Administrators find recordings saved to the Controller under Access & Secrets → Recordings in the admin console, where they can view, download (.cast) and delete them. Whether clients may save recordings to the Controller is controlled by the Session Recording switch in the Controller's Terminal Sessions settings.